> ## Documentation Index
> Fetch the complete documentation index at: https://docs.sellauth.com/llms.txt
> Use this file to discover all available pages before exploring further.
# Shopify
> Take payments through your existing Shopify store, using a custom Shopify app and a fulfillment webhook back to SellAuth.
If you already run a Shopify store with payments set up, you can take payments through it from your SellAuth shop. Buyers pay through Shopify, and Shopify notifies SellAuth when the order is fulfilled so delivery runs.
This is the longest setup of any payment method. It needs a custom Shopify app for API access, and a webhook for the payment confirmation.
**Before you start, you'll need:**
* An active SellAuth shop
* An active, paid Shopify plan
* A payment processor already set up and working on your Shopify store (e.g. Shopify Payments)
* Admin access to your Shopify store, to create and install a custom app
## Create the app
Go to [dev.shopify.com](https://dev.shopify.com/dashboard/) and click **Create app**. Name it SellAuth, or anything you like.
Under **Configuration > Access scopes**, enter exactly:
```
read_draft_orders,write_draft_orders,read_orders,write_orders,read_customers,read_products,read_shopify_payments_disputes
```
Click **Save**, then go to **Release** and click **Release** again to confirm.
From the app homepage, click **Install app** and confirm.
In the app settings, copy the **Client ID** and **Client Secret** into the matching fields on the SellAuth payment method page.
## Configure your Shopify store
These settings control when payments capture and when orders fulfill — both have to be right before the webhook can do its job.
Go to [Settings > Notifications > Webhooks](https://admin.shopify.com/settings/notifications). Under **Your webhooks will be signed with**, copy the string into **Webhook Signature** on the SellAuth payment method page.
Go to [Settings > Payments](https://admin.shopify.com/settings/payments) on your store, then **Payment configuration**. Under **Payment capture method**, choose either **Automatically at checkout** or **Automatically when the entire order is fulfilled**.
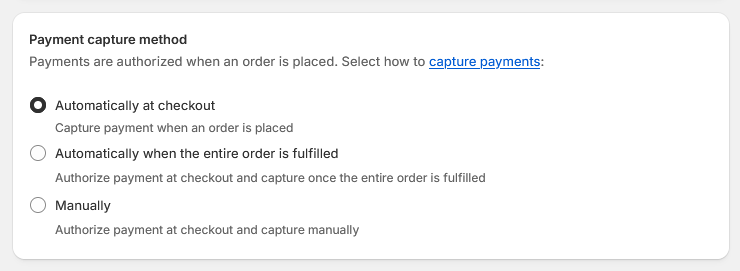 Manual capture is not supported. If it is left on manual, payments authorize in Shopify but never capture, and SellAuth never receives a fulfillment event to trigger delivery.
Go to [Settings > General](https://admin.shopify.com/settings/general) on your store, then **Order processing**. Enable **Automatically fulfill the order's line items** — this is what fires the fulfillment event the webhook listens for.
Manual capture is not supported. If it is left on manual, payments authorize in Shopify but never capture, and SellAuth never receives a fulfillment event to trigger delivery.
Go to [Settings > General](https://admin.shopify.com/settings/general) on your store, then **Order processing**. Enable **Automatically fulfill the order's line items** — this is what fires the fulfillment event the webhook listens for.
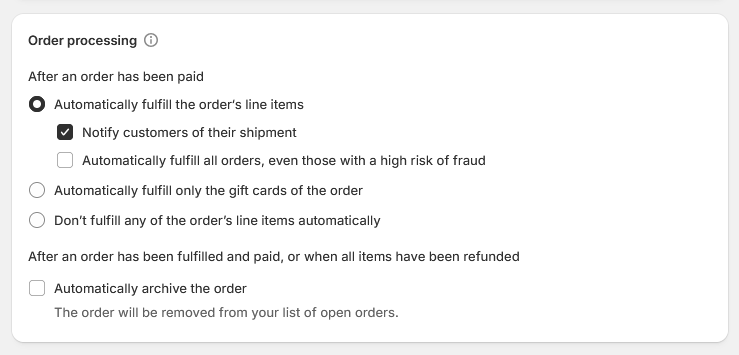 We also recommend enabling **Notify customers of their shipment** and disabling **Automatically fulfill all orders, even those with a high risk of fraud**, so risky orders can be reviewed manually before delivery.
## Add the webhook
Without the webhook, payments succeed in Shopify and orders are never delivered in SellAuth.
Back in [Settings > Notifications > Webhooks](https://admin.shopify.com/settings/notifications), click **Create webhook** and set:
| Field | Value |
| - | - |
| Event | Order Fulfillment |
| Format | JSON |
| URL | `https://webhooks.sellauth.com/v1/shopify/YOUR_SHOP_ID` |
| API version | 2026-07 |
Your shop ID is shown in the setup instructions on the payment method page in the dashboard.
Save the webhook in Shopify, then save the payment method in SellAuth.
## Remaining settings
**Storefront Domain.** Your `your-shop.myshopify.com` address.
**Storefront Currency.** The currency your Shopify store operates in, required so totals convert correctly. Set it in your SellAuth dashboard, on the same payment method's **Payment Methods** page, under **Storefront Currency**. An incorrect value charges buyers the wrong amount rather than producing an error, so check it before going live.
**Storefront Private Access Token** and **Variant ID** are legacy fields kept for older setups. New connections use the client ID and secret, and can leave both empty.
## Troubleshooting
**Buyers pay but orders never deliver.** The webhook is missing, pointed at the wrong URL, or the signature string does not match. All three produce the same result. Also check that **Automatically fulfill the order's line items** is enabled under Order processing, and that the payment capture method is not set to **Manual** — either one stops the fulfillment event from firing at all.
**Requests fail with a permissions error.** A scope is missing. Re-enter the full scope list, save, then release the app again, since scope changes do not apply until the app is released.
**Totals are wrong.** The storefront currency does not match your Shopify store.
## Anti-fraud
Optional settings to reduce fraudulent and disputed orders. Both live in Shopify, outside the SellAuth payment method setup.
These are worth doing even if you're not seeing fraud yet — they take a couple of minutes and cost buyers nothing at checkout.
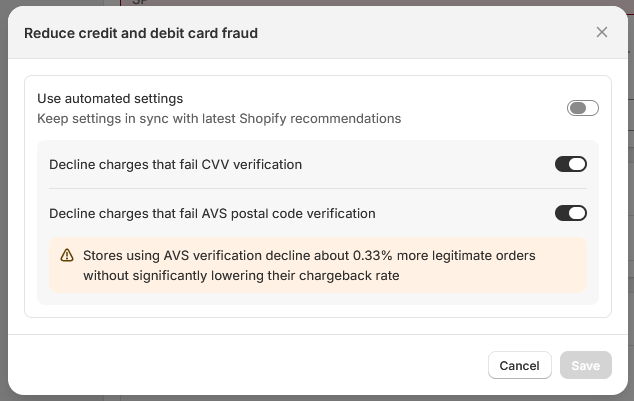
Go to [Settings > Payments](https://admin.shopify.com/settings/payments), then under **Shopify Payments**, click **Manage** in the top right. Scroll to **Fraud prevention** and open it.
Turn off **Use automated settings** — the checks below only apply while this is off. Then enable:
* **Decline charges that fail CVV verification**
* **Decline charges that fail AVS postal code verification**
We also recommend enabling **Notify customers of their shipment** and disabling **Automatically fulfill all orders, even those with a high risk of fraud**, so risky orders can be reviewed manually before delivery.
## Add the webhook
Without the webhook, payments succeed in Shopify and orders are never delivered in SellAuth.
Back in [Settings > Notifications > Webhooks](https://admin.shopify.com/settings/notifications), click **Create webhook** and set:
| Field | Value |
| - | - |
| Event | Order Fulfillment |
| Format | JSON |
| URL | `https://webhooks.sellauth.com/v1/shopify/YOUR_SHOP_ID` |
| API version | 2026-07 |
Your shop ID is shown in the setup instructions on the payment method page in the dashboard.
Save the webhook in Shopify, then save the payment method in SellAuth.
## Remaining settings
**Storefront Domain.** Your `your-shop.myshopify.com` address.
**Storefront Currency.** The currency your Shopify store operates in, required so totals convert correctly. Set it in your SellAuth dashboard, on the same payment method's **Payment Methods** page, under **Storefront Currency**. An incorrect value charges buyers the wrong amount rather than producing an error, so check it before going live.
**Storefront Private Access Token** and **Variant ID** are legacy fields kept for older setups. New connections use the client ID and secret, and can leave both empty.
## Troubleshooting
**Buyers pay but orders never deliver.** The webhook is missing, pointed at the wrong URL, or the signature string does not match. All three produce the same result. Also check that **Automatically fulfill the order's line items** is enabled under Order processing, and that the payment capture method is not set to **Manual** — either one stops the fulfillment event from firing at all.
**Requests fail with a permissions error.** A scope is missing. Re-enter the full scope list, save, then release the app again, since scope changes do not apply until the app is released.
**Totals are wrong.** The storefront currency does not match your Shopify store.
## Anti-fraud
Optional settings to reduce fraudulent and disputed orders. Both live in Shopify, outside the SellAuth payment method setup.
These are worth doing even if you're not seeing fraud yet — they take a couple of minutes and cost buyers nothing at checkout.
Go to [Settings > Payments](https://admin.shopify.com/settings/payments), then under **Shopify Payments**, click **Manage** in the top right. Scroll to **Fraud prevention** and open it.
Turn off **Use automated settings** — the checks below only apply while this is off. Then enable:
* **Decline charges that fail CVV verification**
* **Decline charges that fail AVS postal code verification**
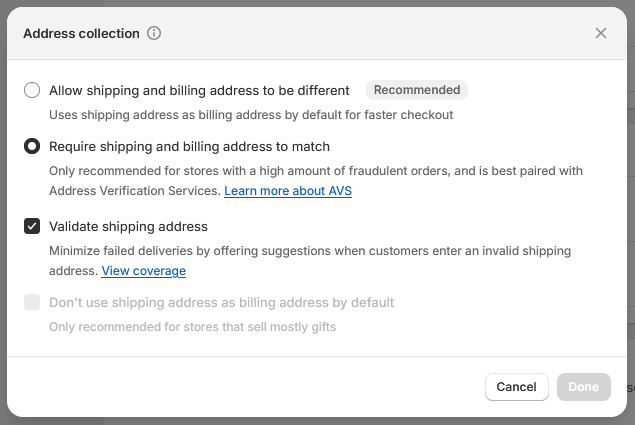
 Only needed if you're seeing fraud already, or want the strongest protection available. Go to [Settings > Checkout](https://admin.shopify.com/settings/checkout), scroll to **Advanced preferences**, and open **Address collection**. Enable:
* **Require shipping and billing address to match**
* **Validate shipping address**
Only needed if you're seeing fraud already, or want the strongest protection available. Go to [Settings > Checkout](https://admin.shopify.com/settings/checkout), scroll to **Advanced preferences**, and open **Address collection**. Enable:
* **Require shipping and billing address to match**
* **Validate shipping address**
 ## Next steps
Lemon Squeezy, Pandabase and Whop.
Everything else you can connect.
This documentation is built and hosted on [Mintlify](https://mintlify.com), a developer documentation platform.
## Next steps
Lemon Squeezy, Pandabase and Whop.
Everything else you can connect.
This documentation is built and hosted on [Mintlify](https://mintlify.com), a developer documentation platform.